CONTENT
Poultry Brooder Management: Types, Equipment and Brooding Practices
Poultry brooder management involves providing the appropriate temperature, lighting, feeding, watering, and environmental conditions required for chicks during the early weeks of life. Proper brooding is essential because young chicks have an underdeveloped thermoregulatory system and are highly sensitive to temperature fluctuations. This article covers the major types of brooding equipment and important practices for effective brooder operation.
Egg-type female chicks are received as day-old chicks (DOC) at the farm, and they require additional warmth during the early age for at least two to three weeks. The thermoregulatory mechanism of a newly hatched chick is not well developed and takes about two weeks to become fully developed and maintain homeostasis. Therefore, chicks cannot maintain their body temperature properly during the first few weeks of life and may be subjected to chilling if not properly taken care of.
Under these circumstances, artificial brooding is mainly aimed at providing extra heat or warmth during the first two to three weeks of the chick’s life. This is done to prevent cold shock, since the environmental temperature may be lower than the hatcher temperature. A brooder simulates the care and attention of a mother hen.
Types of Brooding Equipment
Many types of equipment are used in brooding. Ordinary incandescent bulbs of 100 watts or 60 watts can be used. The normal rule of thumb to be followed is one watt per chick. Some people use hovers with these bulbs fixed inside. These can accommodate 200 to 250 chicks, and the hovers can also have heating elements instead of incandescent bulbs. The height of the hover may initially be adjusted to one foot above the floor level.
Infrared Bulbs
Infrared bulbs can be used as they heat up quickly. They are self-reflecting in nature and can provide warmth for 200 to 250 chicks, but they are expensive.
Gas Brooding
Gas brooding is now practiced particularly in semi-environmentally controlled and environmentally controlled houses. These systems are costly but can accommodate 1,500 to 2,000 chicks.
Heater Coils
Heater coils may also be provided for warmth instead of bulbs. Heater coils of various wattage capacities with thermostats, reflector hoods, and hanging chains are available for providing heat to chicks. These coils are more suitable for cold climates because they provide more heat. Separate tube lights have to be provided for lighting the house. They have to be hung above the reach of the chicks.
Centralized Heating System
A centralized heating system for brooding is followed in environmentally controlled poultry houses, where the room temperature is maintained at an average of 32оC during the first week of age.
Battery Brooders
Multi-tier cage brooding is practiced here. Bulbs or heaters with thermostats are used to provide warmth to chicks in the battery cages.
Biogas Brooders
Certain farms use cage droppings and cow dung to generate biogas, which is used to provide light and heat to the birds.
If kerosene stoves or coal stoves are used, a metal vessel containing sand is placed over the stove to dissipate heat properly.
To provide warmth, canopy brooders (umbrella type with electrical tungsten bulbs), infrared bulbs, coal stoves, or gas brooders may be employed. The common practice is to use a hover with electrical bulbs.
Brooder Operation
About 24 hours before the anticipated time of arrival of the chicks, the brooder arrangements are made and kept ready. The house is cleaned, whitewashed, and blow-lamped. Dry litter material such as sawdust, wood shavings, paddy husk, etc. is spread to a height of 5 cm, and newspaper has to be placed over this to prevent the chicks from consuming the litter material.
The brooder guards can be made of metal sheets or even cardboard. The brooder guards have to be arranged in a circular fashion on the litter material with the necessary heating arrangements.
The house may be prepared beforehand for this purpose and kept vacant for a considerable length of time (minimum two weeks); 225 chicks may be placed in a brooder arrangement with a 150 cm diameter, and 300 chicks in an 180 cm-diameter brooder guard circle.
Cartwheel Arrangement of Feeders and Waterers
The required number of feeders and waterers are arranged alternately with each other on the newspaper-covered area. The chick waterers should be placed alternately in a radiating pattern to give a “cartwheel” appearance. Care should be taken to avoid placing them too close together at the center under the heat source. Keep feeders open for five hours and also spread some feed on the newspaper.
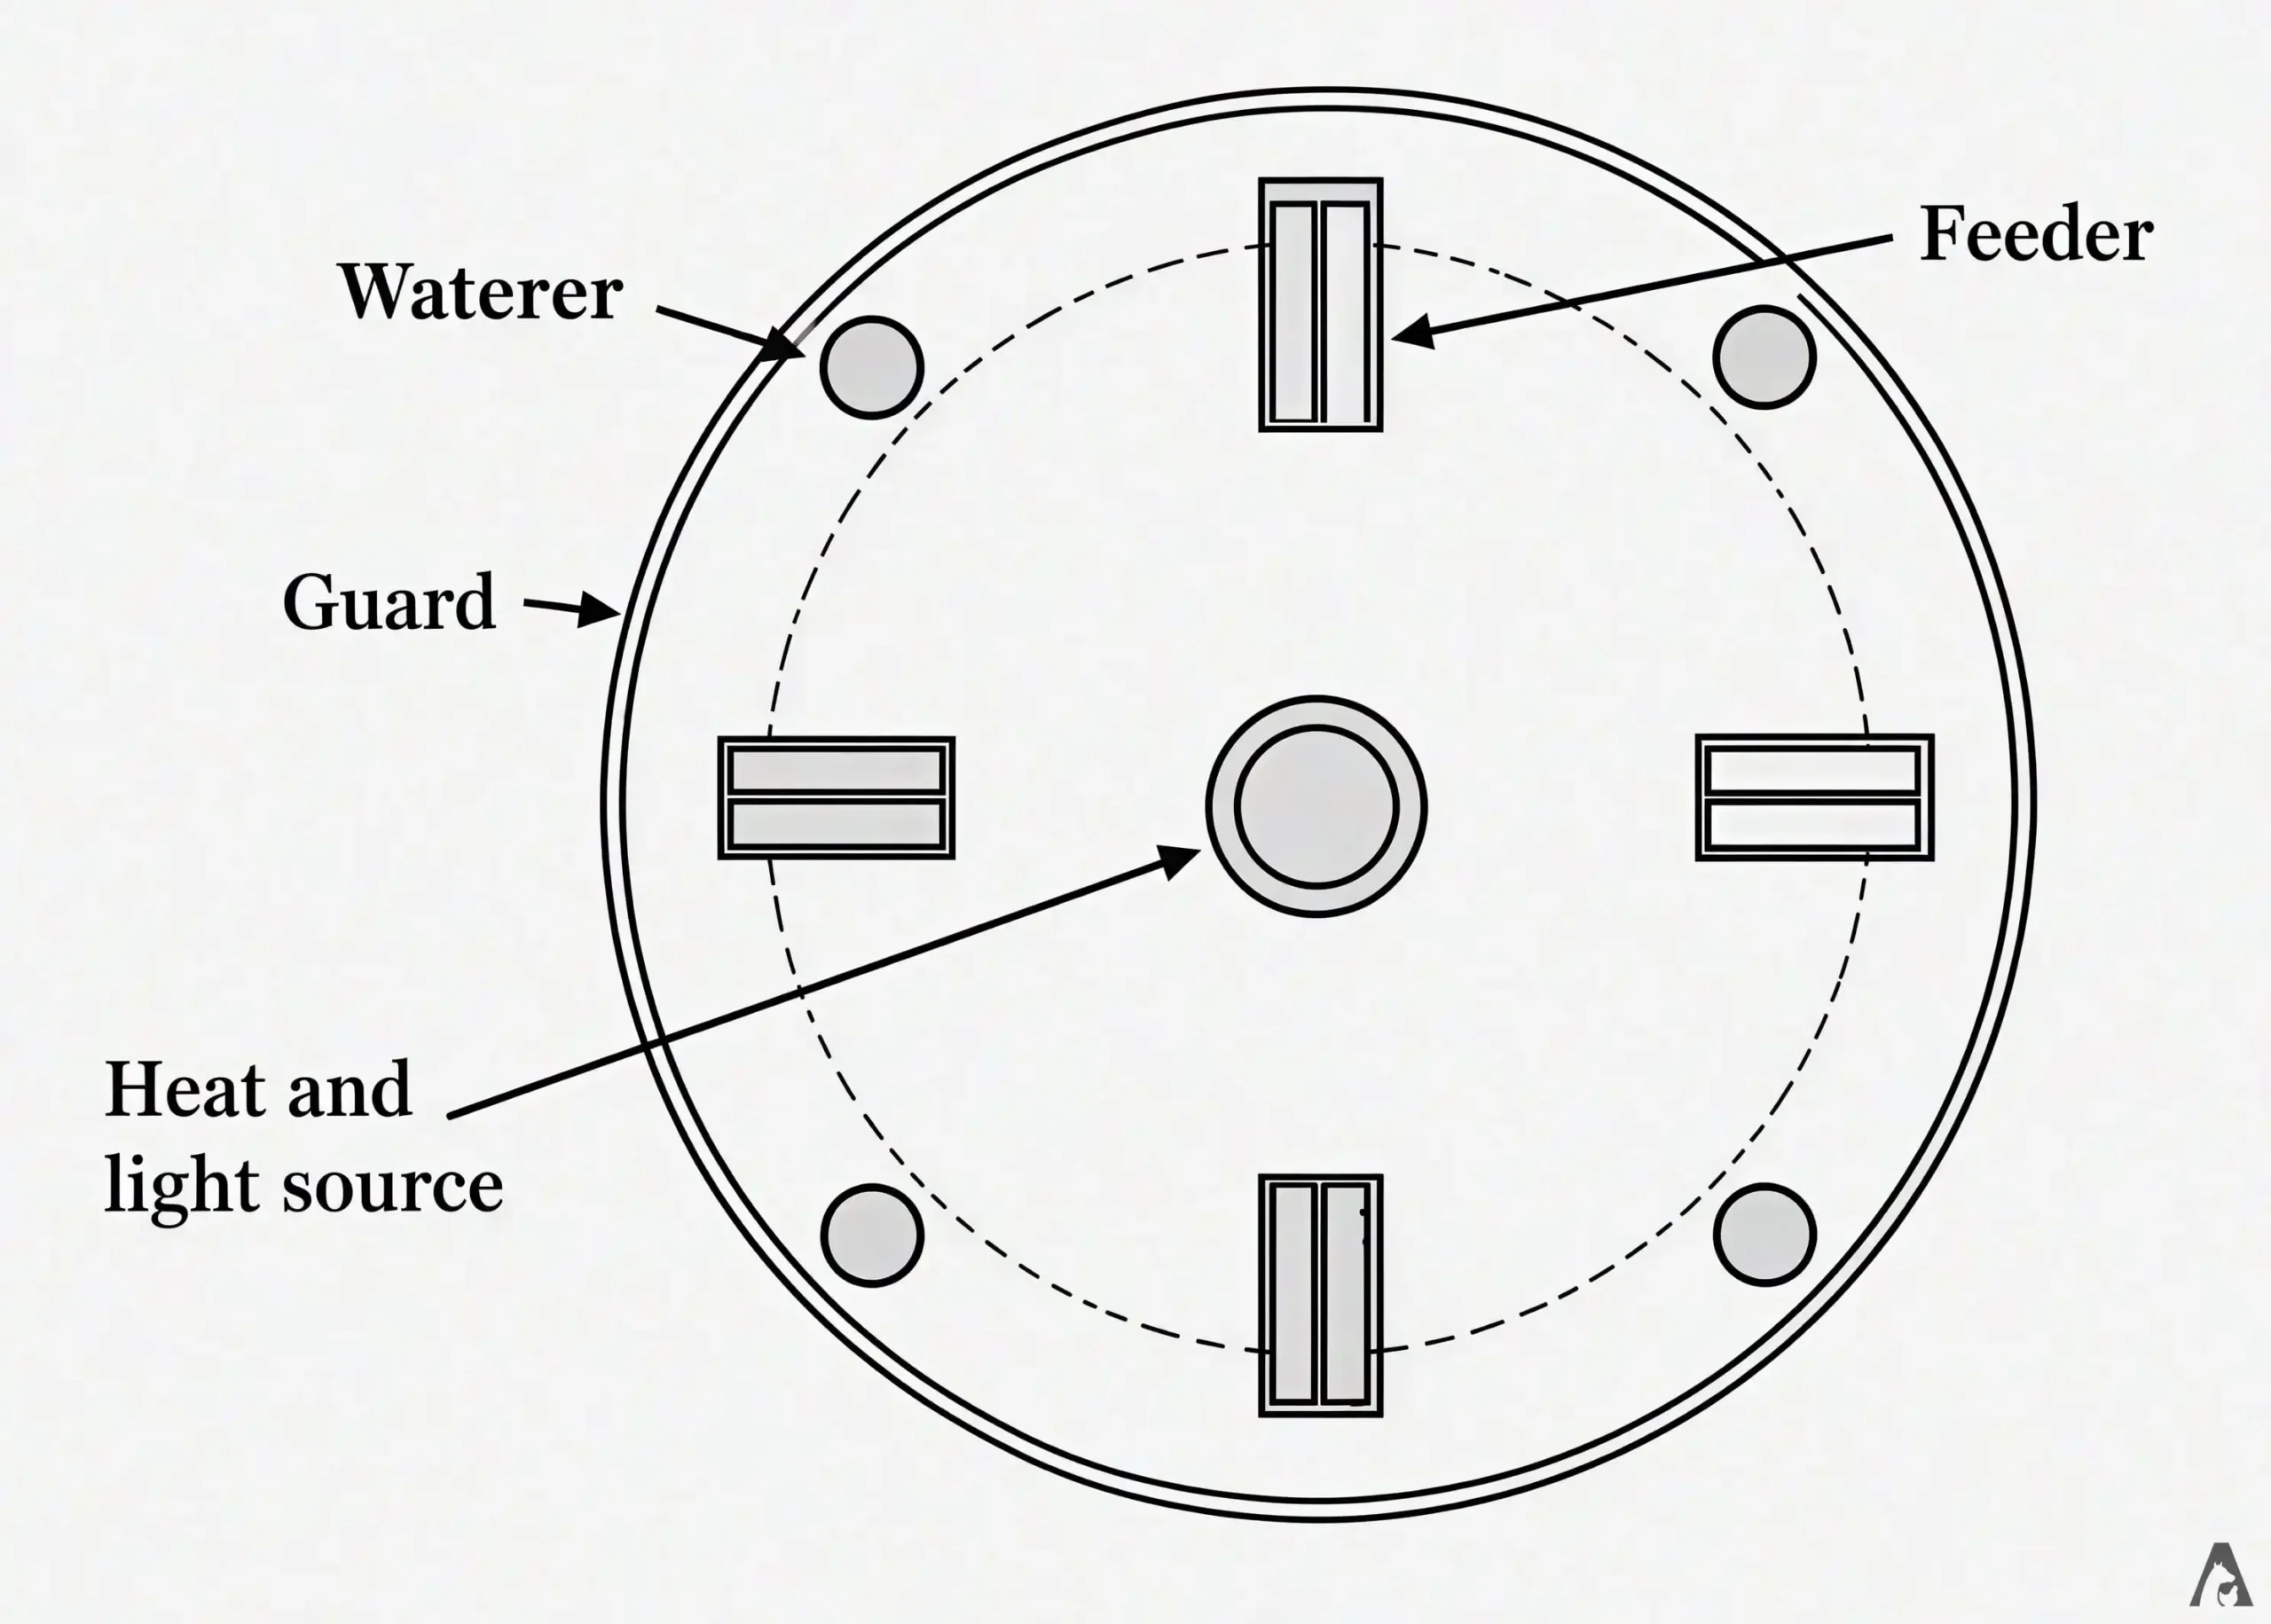
Two linear feeders of 60 cm in length and two chick waterers may be used for every 100 chicks. Automatic feeders and waterers may also be used according to the manufacturer’s specifications. Allow free-moving space around the waterers and feeders. Switch on the bulbs 1–2 hours before the arrival of the chicks to keep the environment warm. When chicks are delivered, do not allow the delivery vehicle into the farm premises. Take delivery at the entrance itself.
Keep boiled and cooled drinking water ready. Add 8 g of glucose, 0.5–1 g of a mild antibiotic or antibacterial drug per liter, electrolytes, and a vitamin mixture at the recommended dosage to the water for the first day. Antibiotics and vitamins may be continued for 3–5 days. Keep medicated water in the waterers before placing the chicks into the brooder arrangement.
Brooder mash with 22% crude protein and 2700 kcal/kg of metabolizable energy has to be prepared and provided. Good-quality, potable, medicated water has to be provided in the waterers. The health of the chicks should be assessed at the time of delivery.
Before receiving the chicks, the heat source should be switched on. The temperature during the first week is 90–95oF, later reduced by 5oF every week to reach a temperature of 75oF. The brooding period is very sensitive, particularly during the cold months or rainy seasons.
Lighting for heating (brooding) has to be provided for 23 1/2 hours a day for the first 3 days, switching it off for only 30 minutes during the daytime. Later, lighting for heat may be provided during the night only until the end of the 2nd or 3rd week, depending on the season. It may be restricted to one week only during peak summer and extended to three weeks during winter or rainy seasons. During such seasons, it is advisable to close the sides of the house with thick curtains during the first week.